Defines sequence before taste.
The Lightroom guide already establishes that raw editing is order-dependent. This monochrome chapter now does the same for the Silver Efex branch: what happens first, what waits, and what belongs to each stage.
Post-processingSingle documentFrom the monochrome editing guide
This chapter is the black-and-white companion to the Lightroom Classic editing guide. It keeps the edit in a repeatable order so native GFX files retain depth after colour relationships are converted into one luminance axis.
How to use this document
Use this during edit sessions after capture to maintain stream-consistent rendering decisions.
A black-and-white photograph is a depth problem before it is a style problem. Colour originally kept planes apart for free. Once colour is removed, the edit has to replace that lost separation with value order, gradient continuity, edge hierarchy, and surface restraint.
What makes the GFX file special in monochrome is not punch. It is room. The file often begins quieter than smaller-format systems, but inside that quieter negative there are more intervals waiting to be separated. The edit fails when it mistakes that room for weakness and forces instant contrast too early.
That failure is most obvious in long-lens files: reeds, path, blossom, woodland, water, façades, ridge layers. If every plane receives the same structure and the same density at the same moment, the picture collapses into a wall. The chapter below exists to prevent that collapse.
The print becomes dimensional when it refuses to collapse.
The Lightroom guide already establishes that raw editing is order-dependent. This monochrome chapter now does the same for the Silver Efex branch: what happens first, what waits, and what belongs to each stage.
There is no universal film stock, no single filter choice, and no one Structure number that makes GFX files “look right”. The repeatable part is the discipline, not the exact slider values.
Use this order as the default. If the order changes, later adjustments behave differently. Many weak monochrome edits are not taste problems; they are sequencing problems.
Profile, lens correction, white balance, exposure placement, highlight recovery, shadow access, and restrained capture sharpening happen before any monochrome interpretation exists.
Texture, Clarity, and Dehaze are tempting because they make the colour preview feel finished. In the monochrome sequence they are budget-spending moves. Keep them minimal before Silver Efex.
Start from a plain base. Film stocks, strong contrast, and grain decisions come later. First establish the luminance logic of the scene.
If the channel translation collapses foliage, blossom, sky, skin, or masonry into one value family, later contrast cannot truly restore those missing intervals.
Brightness is placement, not a generic “lighter/darker” slider. Decide where the subject belongs first: upper midtone, dark midtone, high midtone, near-white, or near-black.
Most depth decisions are local and directional: this tree forward, that water quieter, this façade clarified, that woodland held back. Do the local hierarchy work before the file receives any global surface treatment.
The subject plane may take the clearest structure. Foreground veil, distant foliage, mist, sky, and skin usually need less. Equal structure everywhere turns compression into flatness.
Only after the print works should you decide whether it needs true black, true white, or a specific grain family. Atmosphere often depends on not reaching the endpoints too early.
The final Lightroom pass owns output sharpening, subtle edge guidance, print/export decisions, and soft proofing. It does not own a new monochrome interpretation.
The Lightroom version before Silver Efex should look flexible, not satisfying. If it already looks dramatic, the monochrome branch is probably being starved of options.
| Lens | LR prep emphasis | Masking tendency | Vignette correction |
|---|---|---|---|
| GF 20-35mm F4 | Protect geometry and wide-scene separation | 20–35 | 100 |
| GF 45-100mm F4 | Keep compression readable without premature drama | 25–40 | 100 |
| GF 100-200mm F5.6 | Preserve long-lens interval spacing for distant planes | 30–45 | 100 |
| GF 80mm F1.7 | Protect skin / bokeh transition and optical falloff | 55–70 | 75 |
The values below are starting states, not fixed recipes. Their real purpose is to preserve the order of decisions so the file stays plastic until the print logic is clear.
Lens behaviour is part of the editing logic. Different GF lenses do not simply “look different” — they arrange spatial problems differently, so the conversion has to respond accordingly.
The wide lens spreads space through geometry. Depth is often already available through distance and foreground/background scale, so the main danger is over-finishing a file that only needed clearer tonal intervals.
Monochrome posture: preserve gradients, keep wide-scene structure disciplined, and do not let sky or water become graphic plates unless the picture is explicitly about that graphic simplification.
This is the balanced, architectural zoom in the monochrome system. It compresses enough to make intervals matter, but not so much that every plane wants to fuse immediately.
Monochrome posture: good for stage-like depth, tree forms, façades, and path-led landscapes. Needs deliberate hierarchy, but not the rescue work of the longer zoom.
This is the lens that most clearly proves why sequence matters. It stacks planes tightly — reeds, water, ridge layers, façades, woodland, distant detail — and the edit must re-separate what the perspective compressed.
Monochrome posture: subject brighter, background quieter, foreground soft if needed, Structure assigned selectively, and no equal crispness across every plane.
The 80 isolates subject and context optically before the conversion begins. The monochrome responsibility here is less about rescuing compression and more about protecting gradient, surface, and the transition into out-of-focus space.
Monochrome posture: low global structure, careful masking, and no sharpening decisions that destroy the lens’s own rendering.
The monochrome branch is still order-dependent, but now it crosses two renderers. Lightroom prepares a flexible colour negative, Silver Efex interprets the luminance logic, and Lightroom finishes the file for output. Each step operates on the result of the previous — order is not preference, it is physics.
The examples show the sequence in use. The values below are not universal presets; they show how the edit behaves under two different lens problems.
The long-lens file stacks left reeds, path, flowering tree, right reeds, and woodland close together. In colour they still separate through hue families. In monochrome they want to merge into one density block unless the conversion explicitly assigns each plane a job.
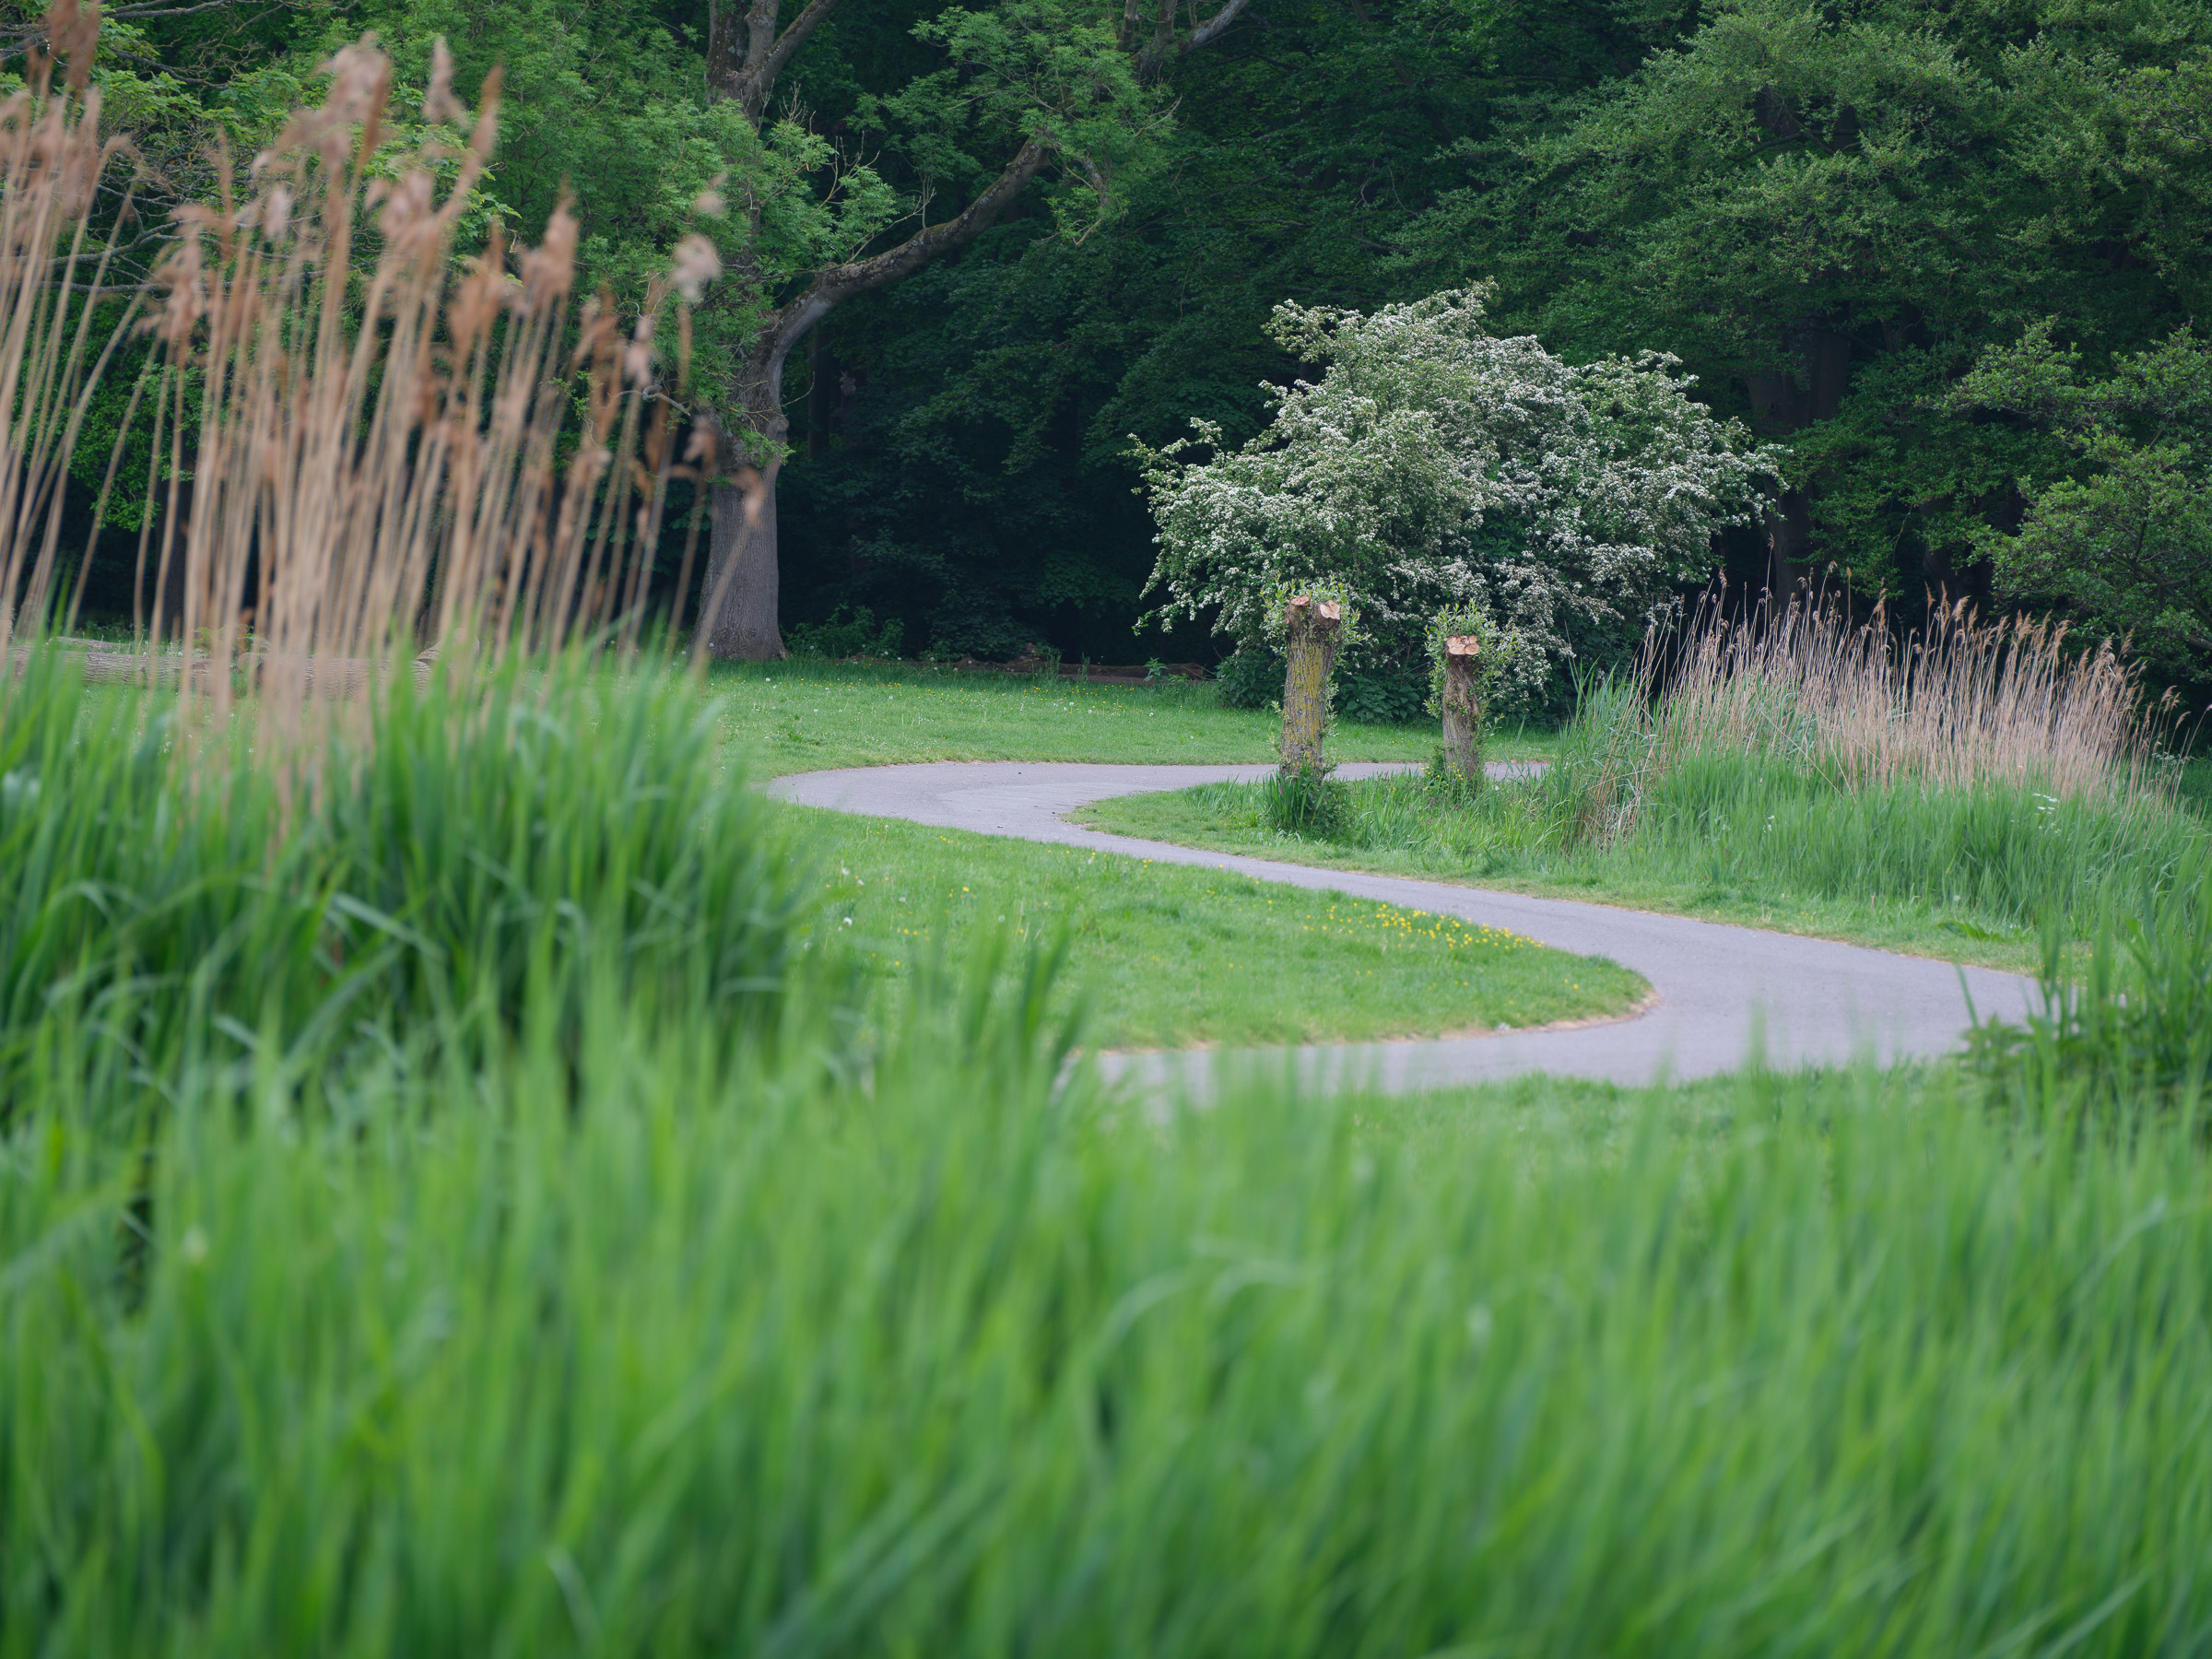
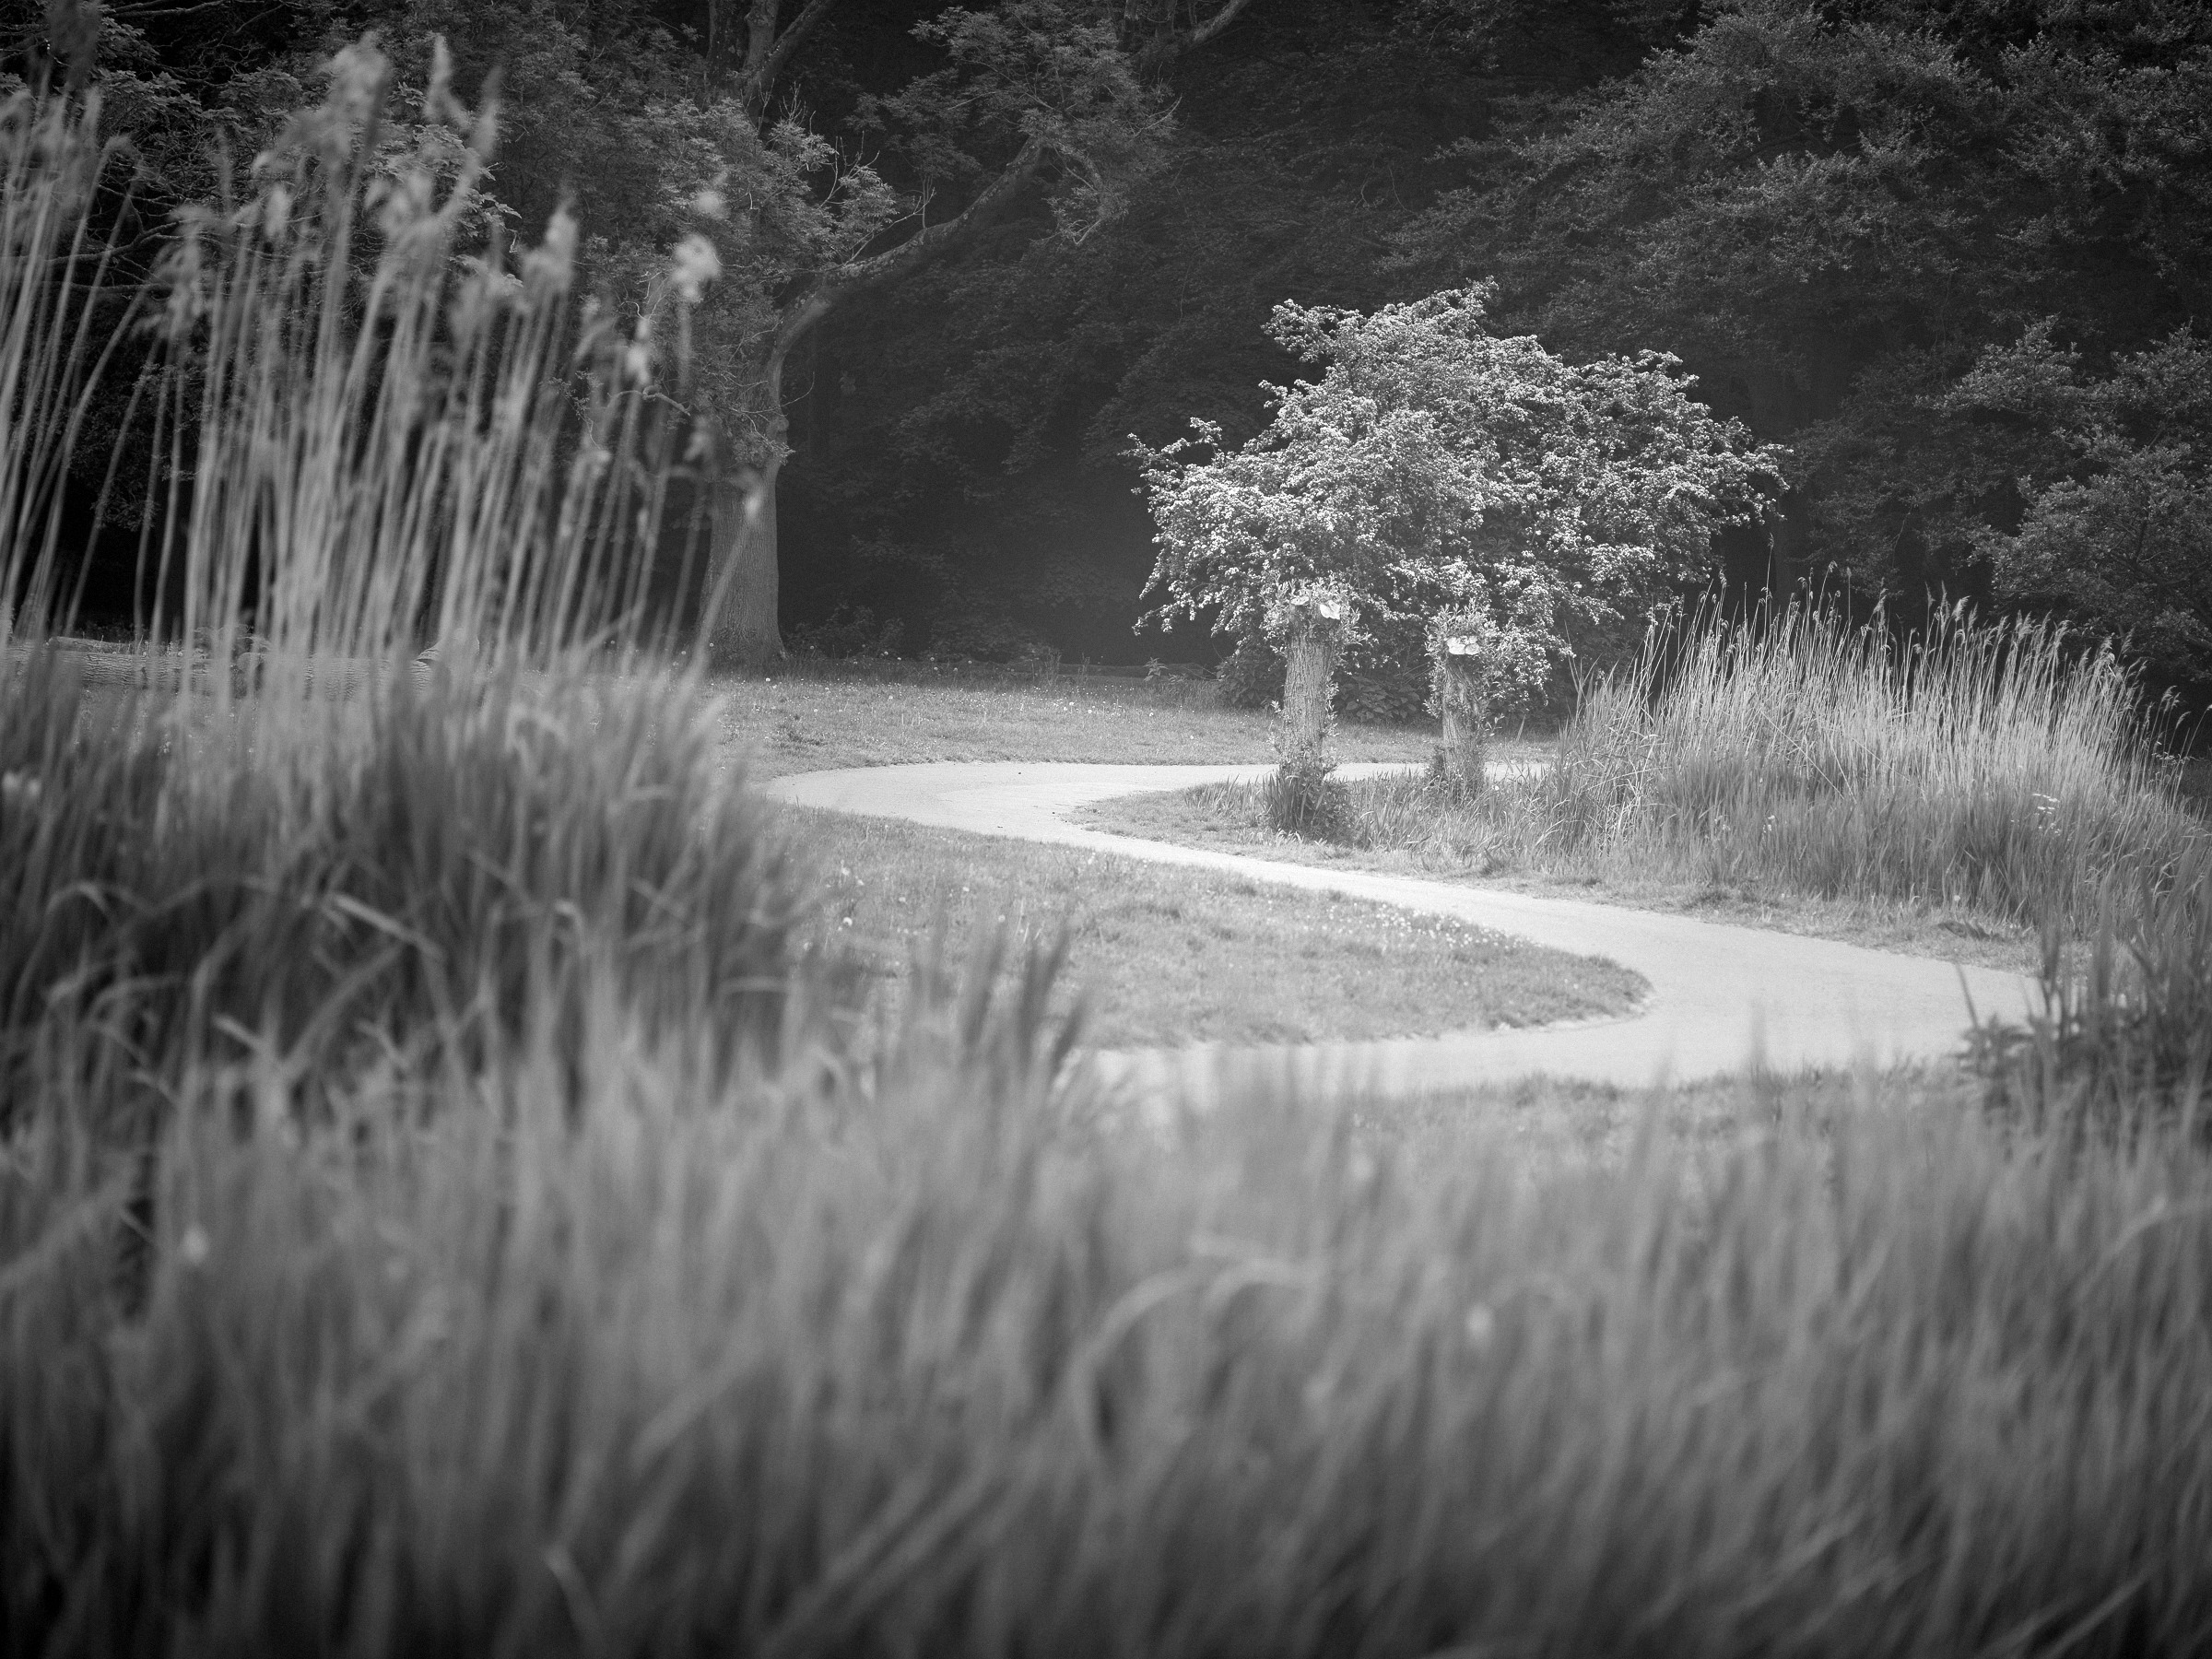
The prepped file stays open so the woodland keeps multiple values, the blossom stays alive, and the path does not blow into graphic white too early. The file looks less satisfying in colour precisely because it is still usable.
At this focal range, the edit is deciding what distance feels near, what remains atmospheric, and what gets to carry the viewer. The lens compresses; the print re-orders.
This frame is the opposite problem. It already has a stage: dark trunks, luminous grass, water strip, pale central tree. The edit does not need to invent depth; it needs to stop secondary attractors from taking over.
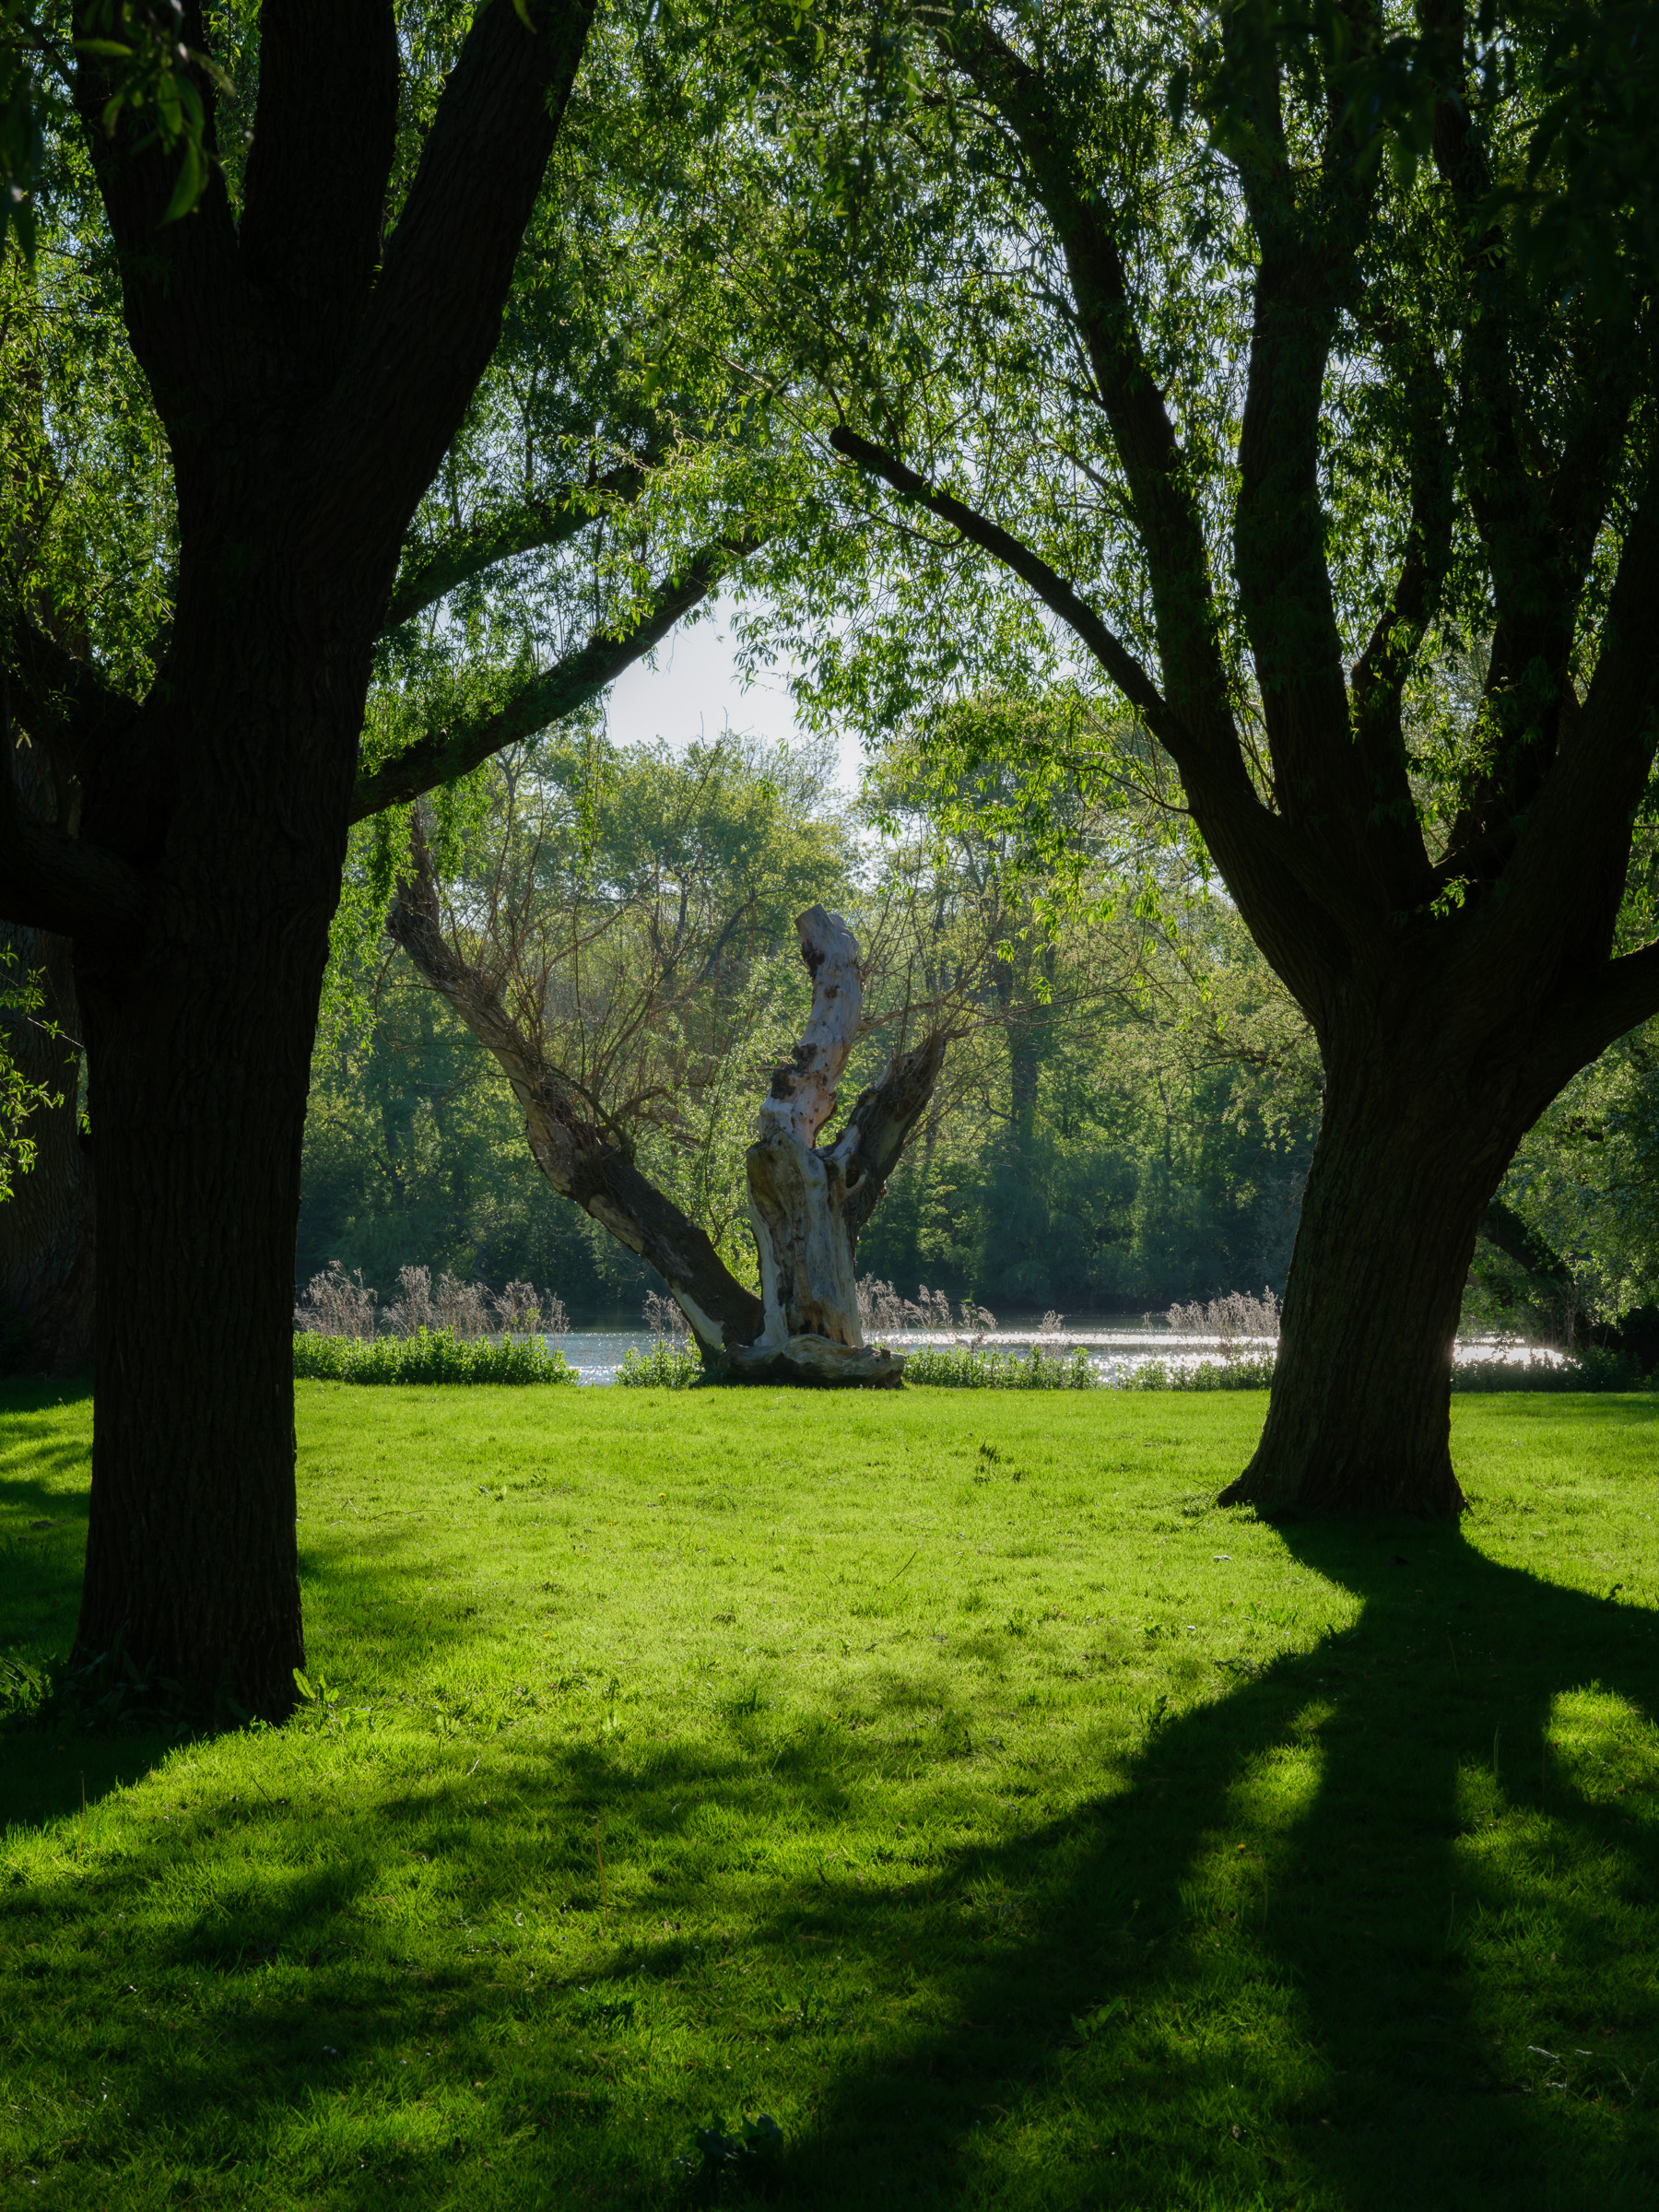
The dark trunks are the stage edge. The grass is the lit floor. The pale tree is the subject. The water is dangerous because it wants to become the brightest graphic object if unmanaged.
Use a green/yellow-green direction, keep trunks dark but not crushed, lift the central tree locally, and quiet the water if it starts pulling the eye away from the intended subject.
These are starting postures, not final looks. Their value is that they remind you which variable usually matters first in each type of scene.
| Scene | Filter tendency | Anchor question | Depth caution |
|---|---|---|---|
| Soft overcast landscape | Yellow or none | What single midtone family carries the frame? | Do not create false drama by crushing the endpoints. |
| Foliage / vegetation | Yellow-green | Which foliage family must separate from the rest? | Coarse global Structure on leaves usually creates noise, not depth. |
| Portrait | Yellow / orange | Where should skin sit luminance-wise? | Protect gradients and bokeh; structure stays local and light. |
| Architecture | Orange / yellow | Which plane defines the building’s reading? | Heavy structure can fragment otherwise clean surfaces. |
| Water / reflection | Orange often useful | Is the water the subject or merely the guide? | Do not texture water unless the surface itself is the point. |
| Mist / atmosphere | None / yellow | How high must the atmospheric family stay? | Rescuing mist into contrast destroys the reason it works. |
| Long-lens compression | Choose for subject/background split | Which plane deserves the clearest structure? | Especially with the GF 100-200mm F5.6, equal crispness becomes flatness fast. |
| Backlit woodland | Yellow-green or orange | What stays luminous, and what becomes the dark stage? | Water, sky holes, and sparkle can easily steal the picture. |
A look is not one saved spectacular conversion. It is the set of decisions that still makes sense after the subject changes.
Failure modes matter because they tell you which stage to return to. Most monochrome problems are diagnosable once the sequence is explicit.
Adjacent surfaces that should separate become the same value. Cause: wrong filter or no filter. Fix: return to channel response first; later contrast cannot invent missing intervals.
The image looks dramatic but flat. Cause: whites and blacks forced before the midtone structure was solved. Fix: restore gradients, then set endpoints last.
Everything looks etched and equally close. Cause: global Structure doing local hierarchy work. Fix: reduce global structure, then assign surface locally by plane.
Bright bands at edges. Cause: Lightroom local contrast stacked with Silver Efex Structure, or overly tight control-point radii. Fix: remove upstream texture drama and widen the local moves.
Compressed reeds, path, ridges, façades, or woodland all sit on the same plane. Cause: long-lens compression plus equal structure everywhere — especially on the GF 100-200mm F5.6. Fix: lower background structure, lift the subject family, and let foreground softness remain soft.
The file is clean but lifeless. Cause: the sequence stayed tidy but never assigned hierarchy. Fix: return to anchor placement and plane relationships, not just grain or extra sharpness.
Support the work
The complete GFX 100S II suite — six shooting streams, field references, and the linked editing guides — is available here. If a document has saved you time in the field or at the edit, a Ko-fi contribution helps keep it going.